
If you have a WordPress website then you will be all so familiar with the update alert messages that often appear when you login to the admin area. This article covers why it is important to ensure that your WordPress website is kept up-to-date and what steps you should take to carry them out safely.

Why is it important to update WordPress?
There is a large team of WordPress contributors that work across the globe to improve its performance, introduce new features, fix bugs and enhance its security. These improvements are made available to WordPress users when an update is released. Therefore, if you choose to ignore these updates you are putting your website at risk.
If your are not interested in new features you should still be concerned about your website’s security. WordPress powers a large percentage (34.9% according to W3Techs) of websites around the world and for this reason they are often targeted by hackers. The upside to this is that bugs and security flaws tend to get reported and resolved quickly.
What about themes and plugins?
Your website will have a theme installed, this is a vital ingredient for any WordPress website. The theme determines the website’s overall appearance, without one your website would not work. WordPress websites often also have third-party plugins installed on them to enhance their functionality.
Most theme and plugin authors release updates throughout the year to ensure that they remain compatible with the latest releases of WordPress, improve security and enhance their functionality. For this reason it is also important that you keep them up-to-date too.
How do I carry out a WordPress update?
If you have a managed WordPress hosting package your updates will be taken care of for you, phew! If not don’t worry you can follow these steps.
Step 1: Choose a Day and Time

Consider the day and time that you would like to carry the updates out. If you have a high traffic website it may be wise to choose a quieter period.
Step 2: Setup a Staging Environment
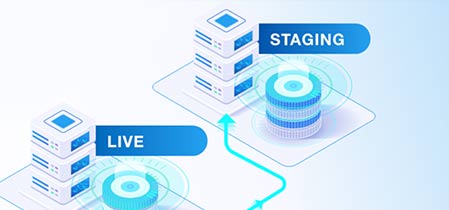
Depending on the type of website that you have you may want to consider setting up a staging environment. This is where you would have a copy of your website which you can use to test updates on before rolling them out onto the live website. This is useful as if anything goes wrong it will not affect your live website. WP Staging is a plugin that will setup a staging environment for you.
Step 3: Take a Full Website Backup

Before you perform updates on your live website make sure that you take a full backup, this includes all of the files and any databases attached to it.
Depending on the type of website that you have you may wish to put it into maintenance mode first, this way if you do need to restore you will know that you are uploading the most up-to-date version. Save a local copy of the backup on your computer or an external USB device. There are a number of ways you can obtain a backup:
1. Contact your website’s hosting company and they should be able to provide you with a copy.
2. You may be able to take a manual backup via a wizard in your control panel where your website is hosted.
3. You can install a WordPress backup plugin onto your website, examples include UpdraftPlus, VaultPress and BackupBuddy.
Step 4: Deactivate Caching Plugins

If you have a caching plugin such as W3 Total Cache installed on your website deactivate it before you carry out the updates. This will ensure that your website visitors will see the latest version of the website once it has been updated.
Step 5: Update the Plugins
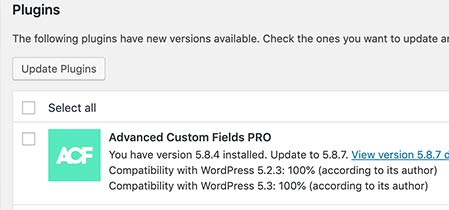
You are now ready to update any plugins that you have installed. Go to Dashboard > Updates. Scroll down and you will see a list of all of the plugins that require an update. Before you carry out the updates click on the ‘View version …’ link for each plugin. This will let you know what changes the author has made should anything not work properly after the update is implemented. Once you are happy you can click on the ‘Select all’ tick box and then click ‘Update Plugins’.
Step 6: Update the Themes
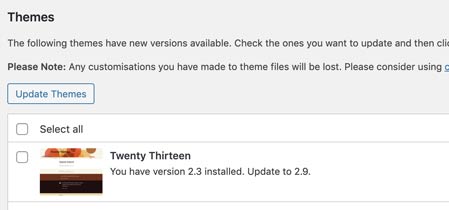
You can now move onto update your themes. To do this go to Dashboard > Updates and scroll down to the themes section. You can use the ‘Select all’ tick box and then click ‘Update Themes’.
Please note that when you update themes, you will loose any customisations that have been made to the files, unless they have been saved in a child theme.
Step 7: Update WordPress
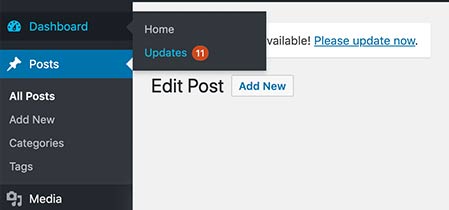
You can now update WordPress. You can click on the link that appears at the top of the admin area or navigate to Dashboard > Updates and click on the ‘Update Now’ button. Wait until the update is complete.
Step 8: Reactivate Caching Plugins and Test

Reactivate any caching plugins that are installed on your website. Next go through your website to make sure everything looks and works as expected. If anything major has gone wrong restore from your backup. If you are happy that the updates have been successful and you have been using a staging environment you can now carry out the same updates on the live website (from Step 3 onwards).
